Introduction
 |
Computer water cooling has been all the range in the last decade and more so within the last three years. Cashing in on this industry are a myriad of differing manufacturers, providing a whole plethora of solutions that is catered for the end-user. One of these are closed-loop liquid cooling systems-offering great ‘bang-for-buck’ prices, however in reality these early solutions performed only on a par with high end air cooling solutions and were a disappointment in general. In recent years that has changed a great deal, with many products easily overpowering that of a large heatsink/fan and whilst not approaching the power and performance of a custom water cooling solution, they ‘All In Ones’ do have sit between both extremes and as such they have their own place on the market today.
One such company that wishes to provide a solution for this segment of the market is the Raijintek Triton.
Company Background
Company Background
About us:
- With the aim of designing high-end products for Lifestyle , Computer and Day-to-Day usage, RAIJINTEK was established in 2013 to accomplishes the future of IT and Lifestyle products.
- This task and aim lead us grow and toward a global brand. Not only highly recommended IT products but we also provide Gaming Gear such as Chassis, PSU’s and Lifestyle products for Smartphones and all your tablet PC’s.
- Fully dedicated to develop best Products for global users, RAIJINTEK’s R&D team never forget the aim to provide a friendly and performing product . Decades experience in industry, RAIJINTEK management would never give up service and product quality to value customers.
(http://www.raijintek.com/en/raijintek_about-us.php last accessed 13/04/2015)
Specifications
Boasting some serious specifications, for an all in one solution, one could say that this has the potential to be an effective solution-given it’s price-point.
| Product Name | TRITON GREEN / TRITON RED / TRITON BLUE | ||||||||||||||||||||||
| Product Number | 0R100019 / 0R100020 / 0R100021 | ||||||||||||||||||||||
| Radiator Dimension [W×D×H] | 275×120×32 mm | ||||||||||||||||||||||
| Tubing Dimension | ID – 9.5 mm – / OD – 12.5mm | ||||||||||||||||||||||
| Thermal Resistance | 0.1 °C/W | ||||||||||||||||||||||
| Weight | 1500 g | ||||||||||||||||||||||
|
|||||||||||||||||||||||
| Liquid capacity | 350ml ±5% | ||||||||||||||||||||||
| Material | Alu. Radiator / Copper Water Block | ||||||||||||||||||||||
The Raijintek Triton and its core version can purchased at £69.95 from Overclockers UK by clicking on the link below.
Let us move on to the packaging and first looks shall we?
Packaging
The sample we received had been on rotation with other review sites and as such received a slight battering both internal and externally, however the essentials are there.
 |
 |
 |
 |
On its front is an image of the Triton with a myriad of differing features that sport a whole bucketful of supported CPU sockets. The back of the box is, again, covered with an image of the cooler, the same list of features, and all supported CPU sockets. The left panel shows all of the colours of the cooler, including that of the Triton ‘Core’ product.
We would have loved to have taken a photo of the internal packaging however due to the above not being in excellent condition we decided not to take a photo ,but instead move straight on to the first looks.
First Looks
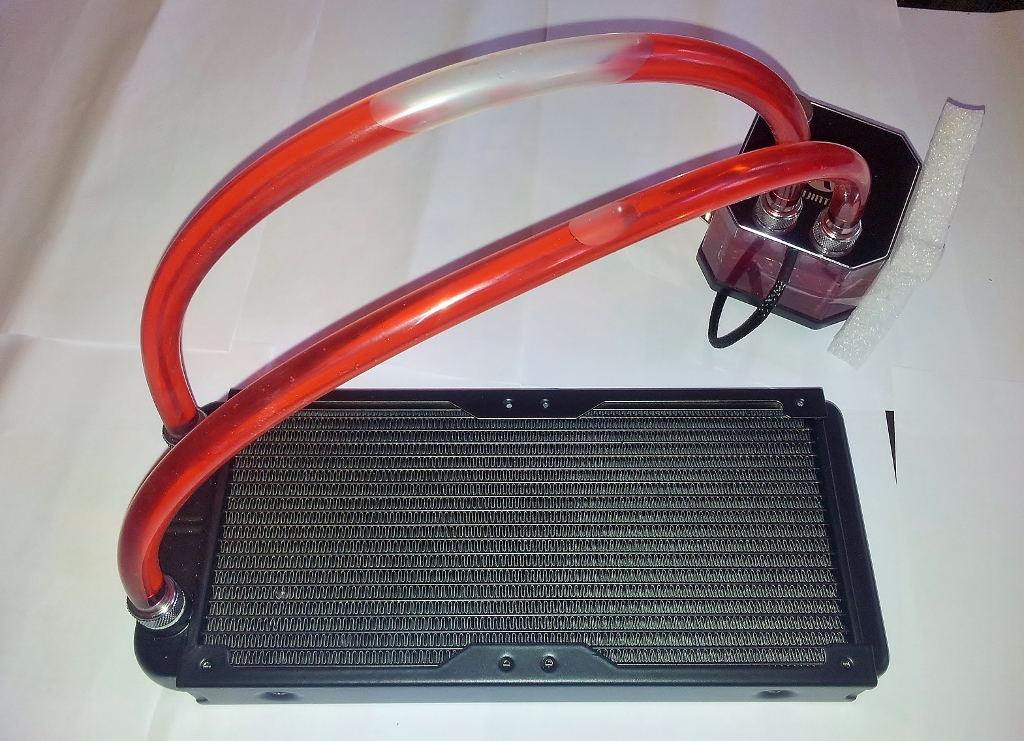
First thing we noticed when unpacking was the massive air bubbles within the loop, luckily Raijintek have included a fill port allowing the consumer to either top the system off or to replace the fluid. The Raijintek Triton sports a 240mm radiator. The radiator length is 260mm in length with a DTF (Distance To Fins) of around 3mm.
 |
 |
 |
 |
What is worth noticing is the FPI (Fins Per Inch) count is 22 and the thickness of the radiator is around 33mm in depth. The general rule of thumb is this the following; Thicker radiator less FPI is needed and therefore less air that needs to be pumped out by the fans, however the thinner the radiator the higher the fin count and as such more powerful fans are needed.
Below shows the aforementioned fin count and the distance to the previously mentioned fins. What is really noticeable are the rods that have been placed inside the radiator to protect the product from being punctured from screws that are too long, what a nice simple touch there.
 |
 |
 |
 |
The compression fittings, whilst look fine would have been better if t hey were black in order to match with the rest of the kit. The quality of the fittings however are of a reasonable standard for an all in one kit and they do indeed firmly hold the tubing. However what really irks us is that the fittings themselves are glued into place. Raijintek stipulates that this is to prevent people from messing about with it, however that is the whole point as it is advertised as an EXPANDABLE all in one solution. For this issue alone we have to lower the scores by four points, as it is really not acceptable!
 |
 |
 |
 |
The final two photos (above) show the mounting bolts, of which will be screwed onto the motherboard framework in order to affix the main reservoir, pump and CPU block. Here we have the underside of the aforementioned together with a protective label. Other review sites will comment on how shiny it is, however the more ‘aged’ of water cooling and overclocking enthusiasts will say ‘shininess’ is not conclusive to being flat. With the latter in mind we at Overclockers Tech will be testing for efficient contact/pressure which we feel goes that ‘extra’ mile for our readers that nobody else will do.
The first two images displayed below, give an indication of where the inlet port of the whole system is, which makes a refreshing change one can change the default liquid and use a fluid that has better performance.
 |
 |
 |
 |
The above photos show the mounting components and instructions on how to fit the above. We have heard that some people have had issues with the installation, however whilst the instructions are not eye-catching they ARE comprehensive and as such even a ‘PC-World’ employee could quite easily put together this product. Lastly Raijintek have seen fit to include ‘dye packs’ of the usual RGB variety also that is nice little extra and does lend a great deal towards the package as a whole.
Below are the fans used within the Triton product, now in the first instance let us tell you they are loud and shift a lot of air-well after all they are of the 2600 RPM variety.
 |
Let us move on to the installation and testing of the Raijintek Triton shall we?
Installation
Installation of the Raijintek Triton should always be started by reading the enclosed instructions. We have heard of people having difficulties following the above guides, however though they are not in full colour they do however clearly and easily explain the full installation procedure.
 |
 |
 |
 |
Installation is acheived by installing the back plate first-together with its rubber spacing grommet (to prevent the back plate from shorting the motherboard) and the mounting posts. Not forgetting the plastic washers that go underneath the nuts to hold the aforementioned posts in the first instance. Finally it is just a matter of installing the top retention plate.
![20150412_150227_(1024x768)[1]](http://www.overclockerstech.com/wp/wp-content/uploads/2015/05/20150412_150227_1024x7681.jpg) |
 |
 |
 |
We forgot to mentioned earlier that the radiator mounting for fans are of the ‘M3’ Variety and such are a breeze to install. On the other side of the fans in order to mount the assembly to the case then the standard 5mm self tapping screws can be utilised.
In the above photos the length of the tubes do look very long as Raijintek have made allowances for multiple radiator positions within any given chassis.
All the installation of the Raijintek Triton was so easy that even a ‘PC World’ employee can manage it.
Testing
As usual with our water cooling reviews we subjected the Raijintek Triton to a barrage of tests designed to compare it with other products in this sector of the market. As such we conducted a comparison between the old Thermaltake 850 GT and the much respected Corsair H100, as the reason for this is that all the products mentioned employ fans that have a top speed of 2600 RPM.
It is all testing the Raijintek Triton on the latest and greatest kit , however most cannot afford the former and many people have older technology. So let us see how the Triton can adapt to an older platform shall we?
Testing equipment/procedure
All ambient air temperatures were at 23.5 degrees
IC-Diamond was used on all cooler tests in order to keep things on an even level.
Equipment Used:
- Core 2 duo 6320 CPU
- DFI LANPART p45 T3RS UTmotherboard
- 1x GEIL DDR3 avexir ram; 2400 8 gigabyte in total
ALL IDLE results were taken by running the CPU AT FULL load for half an hour then left to cool down for half an hour, only then idle results were taken!
Full load results were achieved by running PRIME 95 (small TFTS) for an hour
ALL TESTS were undertaken by using a THIRD-PARTY Lamptron fan controller in order to adjust the fanspeeds (rather than the inbuilt one)
All water cooling solutions full speed fans were 2600 and idle at 1200RPM
in order to keep things fair.
Raijintek Triton, Corsair H100 and Thermaltake results:
CPU IDLE Fans Low and Full/ CPU IDLE
Stock speeds of 1.8GHZ
![FANS_LOW_AND_FULL_cpu_IDLE[1]](http://www.overclockerstech.com/wp/wp-content/uploads/2015/05/FANS_LOW_AND_FULL_cpu_IDLE1.png) |
![1.8_gig_fanslow_and_full_CPU_IDLE[1]](http://www.overclockerstech.com/wp/wp-content/uploads/2015/05/1.8_gig_fanslow_and_full_CPU_IDLE1.png) |
![THERMALTAKe_-IDLE-FANS_LOW_AND_FULL[1]](http://www.overclockerstech.com/wp/wp-content/uploads/2015/05/THERMALTAKe_-IDLE-FANS_LOW_AND_FULL1.png) |
Let us go on to the testing upon the next page shall we?
Continuing our testing of the Raijintek Triton at stock speeds.
Fans Low and Full/ CPU Full Load
![FANS_LOW+FULL_CPU_FULL[1]](http://www.overclockerstech.com/wp/wp-content/uploads/2015/05/FANS_LOW-FULL_CPU_FULL1.png) |
![1.8_gig_fanslow_and_full_CPU_FULL_LOAD[1]](http://www.overclockerstech.com/wp/wp-content/uploads/2015/05/1.8_gig_fanslow_and_full_CPU_FULL_LOAD1.png) |
![FULL_LOAD_RESULTS[1]](http://www.overclockerstech.com/wp/wp-content/uploads/2015/05/FULL_LOAD_RESULTS1.png) |
Now we move onto the results taken when the processor is Overclocked to 3.0 gigahertz.
Fans Low and Full CPU IDLE
![FANS_LOW+FULL_CPU_idle[1]](http://www.overclockerstech.com/wp/wp-content/uploads/2015/05/FANS_LOW-FULL_CPU_idle1.png) |
![fans_low_and_full_CPU_IDLE[1]](http://www.overclockerstech.com/wp/wp-content/uploads/2015/05/fans_low_and_full_CPU_IDLE1.png) |
![THERMALTAKe_-IDLE-FANS_LOW_AND_FULL[1]](http://www.overclockerstech.com/wp/wp-content/uploads/2015/05/THERMALTAKe_-IDLE-FANS_LOW_AND_FULL11.png) |
Fans Low and Full CPU FULL LOAD. 3ghz Overclock
![FANS_LOW+FULL_CPU_FULL[1]](http://www.overclockerstech.com/wp/wp-content/uploads/2015/05/FANS_LOW-FULL_CPU_FULL12.png) |
![FaANS_LOW_AND_FULL_cpu_full[1]](http://www.overclockerstech.com/wp/wp-content/uploads/2015/05/FaANS_LOW_AND_FULL_cpu_full1.png) |
![FANS_IDLE_AND_FULL__cpu_full_load[1]](http://www.overclockerstech.com/wp/wp-content/uploads/2015/05/FANS_IDLE_AND_FULL__cpu_full_load1.png) |
Already we can see the Raijintek outperforming (by a small amount) the much-loved Corsair H100 and by a larger amount.
Let us move on to our final Overclock shall we?
3.2 GHZ Overclock FANSLOW/FULL CPU Idle
![FANS_LOW+FULL_CPU_IDLE[2]](http://www.overclockerstech.com/wp/wp-content/uploads/2015/05/FANS_LOW-FULL_CPU_IDLE2.png) |
![FANS_LOW+FULL_CPU_IDLE[1]](http://www.overclockerstech.com/wp/wp-content/uploads/2015/05/FANS_LOW-FULL_CPU_IDLE1.png) |
![fans_low_and_full_CPU_IDLE[1]](http://www.overclockerstech.com/wp/wp-content/uploads/2015/05/fans_low_and_full_CPU_IDLE11.png) |
3.2 GHZ Overclock FANSLOW/FULL CPU Full Load
![FANS_LOW+FULL_CPU_full[1]](http://www.overclockerstech.com/wp/wp-content/uploads/2015/05/FANS_LOW-FULL_CPU_full1.png) |
![FANS_LOW_AND_FULL_cpu_FULL[1]](http://www.overclockerstech.com/wp/wp-content/uploads/2015/05/FANS_LOW_AND_FULL_cpu_FULL11.png) |
![FANS_LOW_AND_FULL_cpu_full_load[1]](http://www.overclockerstech.com/wp/wp-content/uploads/2015/05/FANS_LOW_AND_FULL_cpu_full_load1.png) |
As we can see the Raijintek Triton outperforms the Corsair H100 by the narrowest of Margins and easily cools more efficient than the Thermaltake 850 GT LCS solution. However let us just take the first two contenders the Triton and the H100 for a direct comparision shall we?
Both of the above sport 2600 RPM fans and both support 240mm radiators, tyhen if we factor in that in sooth the perform very similar than one can only judge which is better for the consumer by price and other features. The Triton is around £30-£40 less costly than the Corsair model and the former is expandable to boot. Quite the bargain really.
Let us move on to the conclusion-in order to translates the results a little better.
Conclusion
What to make of the Raijintek Triton? In sooth the the product does exactly what it says on the tin and more. The overall presentation of the product is a wonder to behold and the build quality is simply outstanding. To add to this is that the Triton itself is expandable and if the consumer does not like the fluid that comes bundled with the product then one can quite easily change for another such as the rather wonderful Mayhem’s X1 range of fluids.
All this awesomeness would not be without its faults and that would be due to the issue of the compression fittings being ‘glued’ in and not just by a simple thread. This limits its ‘expansion’ potential a great deal and though we do see the need for Raijintek to take this approach ( in order to stop ambitious novices from breaking the product) it does however alienate the more advanced users. The good news is that a modification enthusiast can simply heat up the glue carefully in order to remove the compression fittings for those with a wide tubing support. Speaking of the fittings, we do feel that the Triton would have been better served if they were black however in fairness this is just nit-picking.
The Raijintek Triton is a great performer and outstripping the Thermaltake product and eclipsing the much hyped Corsair H100 by the narrowest of margins. Now adding the expansion potential, fluid changing features and overall aesthetics and build quality over the Corsair H100 then this product does have a lot going for it indeed. If this were not enough the Raijintek Triton is currently priced over £30 less than the Corsair H100 and that is indeed the deal maker.
Pros:
- Expandable (see also cons)
- Quality Construction.
- Presentation.
- Ease of use/ Build.
- Performance.
- Cost effective.
Cons:
- Compression fittings are glued in.
Here we pride ourselves on being very ‘stingy’ with our gold awards and many a manufacturer have said that obtaining these from us is like getting hold of rocking-horse dung. However the Triton has really well and truly earned its place in our ‘gold’ hall of fame with a 9.0 out of ten.
 |
We would like to thank OCUK for the review sample.
This can be purchased by clicking the logo below.
Author: Gilgamesh


 Posted in
