Introduction.
 |
As processors obtain faster speeds with each generation then it usually brings a greater amount of heat-due to the limitations of the silicon itself. Many manufacturers have self-proclaimed ‘their’ processor cooling fans to be the best in a myriad of environments and being able to do so quietly. This is by no means an easy feat when it has to fit a number of differing motherboard and system configurations. Getting the right combination of cooling and noise can be very difficult to get right. One such manufacturer whom believes that they have the right combination is Raijintek with their new product, the rather unusually named Tsis.
Company Background
About us:
- With the aim of designing high-end products for Lifestyle , Computer and Day-to-Day usage, RAIJINTEK was established in 2013 to accomplishes the future of IT and Lifestyle products.
- This task and aim lead us grow and toward a global brand. Not only highly recommended IT products but we also provide Gaming Gear such as Chassis, PSU’s and Lifestyle products for Smartphones and all your tablet PC’s.
- Fully dedicated to develop best Products for global users, RAIJINTEK’s R&D team never forget the aim to provide a friendly and performing product . Decades experience in industry, RAIJINTEK management would never give up service and product quality to value customers.
(http://www.raijintek.com/en/raijintek_about-us.php last accessed 21/10/2014)
Specifications:
Boasting some serious cooling potential with these specifications the Tsis should stand toe to toe with many of the high-end coolers out there.
| Product Name | TSIS | ||||||||||||||||||||||
| Product Number | 0R100001 | ||||||||||||||||||||||
| Dimension [WxDxH] | 140x130x166.5 mm | ||||||||||||||||||||||
| Weight | 1050 g [Heat Sink Only] | ||||||||||||||||||||||
| Thermal Resistance | 0.10 °C/W | ||||||||||||||||||||||
| Heat Sink |
|
||||||||||||||||||||||
| Heat-pipe |
|
||||||||||||||||||||||
|
|||||||||||||||||||||||
| ntel® | All Socket LGA 775/115x/1366/201x CPU (Core™ i3 / i5 / i7 CPU) |
| AMD® | All FM2+/FM2/FM1/AM3+/AM3/AM2+/AM2 CPU |
Although the Raijintek boasts some impressive features and specifications, one cannot help but be a little sceptical (knowing how fan manufacturers fudge their specifications) for the reason that the fans produce 70cfm at only 23 DBA at 1200RPM. However they are of the 140mm variety, so trepidation aside, it could be possible to achieve the advertised results.
All these specifications and with a price of just £49.99 at Overclockers UK, which places it between five and fifteen pounds less costly than others such as the Noctua D14 then it is quite reasonable to assume that a bargain could be had here.
Please feel free to click on the image below for a direct link.
 |
Packaging
One can tell straight away that this is a product from Raijintek, with the colour scheme on the box transferred to the product itself. The colour scheme of the box is certainly eye catching and would be sure to stand out amongst our ever-increasing CPU coolers we have had the fortune to test, which lie gathering dust (as this site and reviewer are water cooling enthusiasts) on our shelves.
 |
 |
 |
 |
Though product packaging bares the name of Nemesis, however since our review sample the name has been changed to TSIS, due to copy write issues.
Upon opening the box we are greeted with a top cover which houses the accessories and in turn acts as a layer of protection for the cooler itself. The item is packaged in a mainly white, cardboard box, with a semi gloss finish and plenty of technical detail on the outside panels in order to indicate what lies within. On the packaging there are line drawings of possible configurations and a side view of the fin array with both fans in place.
 |
 |
 |
 |
We knew even before opening the inner box that there was something quite special inside, due to the sheer weight of the box. After removing the inner box or top layer we are greeted with the fittings and all the anti vibration mounts/screws and back plates for varying motherboard sockets.
Let us move on to the first looks shall we?
First looks
Upon unwrapping the inner box, out comes the main cooler assembly still shrouded in thick white card . Turn the assembly so that the CPU contact plate is downward and pop the two interleaved flaps off one after the other and the product emerges. The metal part of the assembly is a combination of plated copper for the heat-pipes and contact plate of which are pinned to an aluminium fin array with 68 fairly massive 39mm deep fins
Quite an impressive size, with regards to the tower, however given its obvious behemoth-like dimensions then one can only wonder what it will be like within a case and on a motherboard?
 |
 |
 |
 |
It is obvious that the product feels solid and oozes quality, by its finish and its sheer weight. Judging by the five points on the top we can deduce that this is a five heatpipe cooler, which should aid in a quick transfer of heat away from the processor. The whole heatsink and including that of the fins has been coated with a layer of nickel-given it a nice glossy -yet classy look
The fins are densely packed and seem a little more robust than most coolers of this price range, as most fins bend really easily and with eager hands during installation then one or two of the aforementioned could easily be bent.
 |
 |
 |
 |
Here we can see five nickel-plated copper heatpipes per side, which are 8mm in width. However the pipes are a non-contact type, which means that the former are not making a direct connection to the CPU surface. It would be interesting to see if there is a real measurable difference between the two.
Raijintek has seen fit to include two Boreas 140mm fans spinning at 1000 RPM in order to cooler the tower itself.
 |
 |
 |
 |
We like the notches in the blades (reminds us of Noctua) which helps to generate more airflow for less Rpm, however as we mentioned before we still find it hard to believe that 70CFM can be produced with these fans.
Fan specifications are:
| roduct Name | Boreas α | |||||||||||||||||||||||
| Product Number | 0R400009~0R400011 | |||||||||||||||||||||||
|
||||||||||||||||||||||||
Finally we have both of the fans paired together for show, having said that we have a feeling that Raijintek have missed a ‘ trick here’ and right now we cannot put our finger on it. Let us investigate further within the review.
 |
 |
Finally are the enclosed instructions, which look to be fairly comprehensive.
It is time now to install this little beast and see what happens.
Installation
Installing this beast is as (to quote Pauline The Restart Officer in the League of Gentlemen TV-Series) simple as Mickey. Just place the mounting screws underneath the correct backing plate and voila almost ready to go. However here we have an issue, we would have preferred to have the mounting posts LOCKED into placed before placement behind the motherboard, in order to make the installation as quick as possible. However the mounting posts remain loose until the retaining nuts are placed on the top side of the system board.
 |
 |
 |
 |
Place the clear plastic washers through the posts one at a time and mount the rubber retaining nuts, which hold the mounting posts in place. Select the correct CPU Top-side plates and place (bare in mind the orientation of these plates determines which way the whole tower faces) them on top of the mounting posts. All that is left then is to tighten the top plate locking nuts.
Having made sure the CPU Integrated Heatsink Spreader is clean, then place a 5.5mm blob of IC Diamond on top. The latter product can be purchased from Overclockers Uk for £6.99
 |
 |
 |
 |
Tear off the tower base contact sticker and carefully place on top of the processor and then install the locking plate (which is shown below) Raijintek has seen fit to include a rather long screw driver, which interestingly enough serves a dual purpose.
The previously mentioned long screw driver serves to tighten the tower locking (as shown below) plate as shown below…..
Also the blade of the screwdriver serves as an excellent back scratcher, only without the added grumblings and complaints that one can expect from the missus!
 |
 |
 |
 |
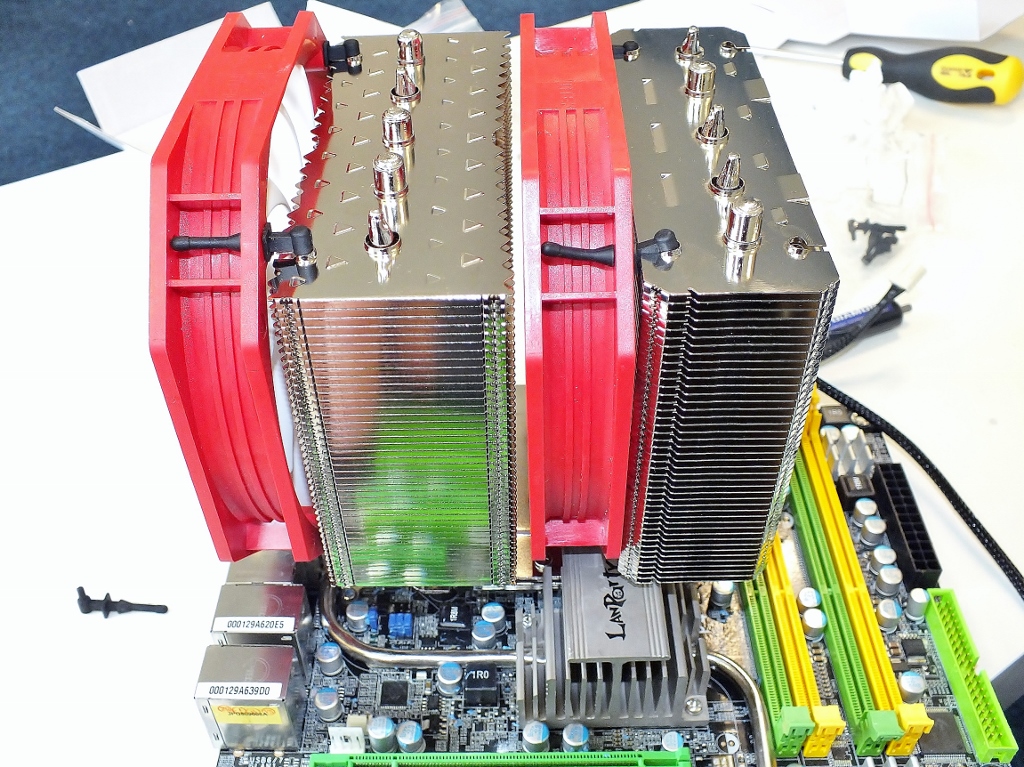
Here we have the first fan, in which we install four anti-vibration mounts, the installation of which depends on the orientation of the fan itself. However here we encounter our first issue as due tot he dimensions of the tower and the fan placed here it effectively blocks access to the first RAM bank and thus prevents any RAM module with a good heatsink spreader. This leaves us with three options:
- Purchase low-profile memory and install before attaching the fan
- or Place the first fan in the centre of tower and PULLING the air through rather than pushing.
- Re-orientate the whole tower (but this leaves cold air coming form the top of the case, however the hot air is then directly pointed towards the graphics card.
Given this situation the only way would be to utilise option two as shown below.
 |
 |
 |
 |
This system is the only realistic option for this motherboard. The first fan pulls the heat away from tower one and through into tower two. The second fans pulls hot air away through tower two and out of the case via its rear.
Remember earlier when we were discussing the two Raijintek fans that we had a feeling that a ‘trick’ was missed? Well here it is and that given there are two fans within the TSIS product then it would have been prudent to daisy chain the fans so only one port on the motherboard is taken up rather than two.
 |
 |
 |
 |
Finally let us get on with the testing and see exactly how effective this product is.
Testing
We tested the performance of the Raijintek against theAlpenfohn Brocken whilst a direct comparision would be striclty onfair as they are at totally two differing price points. However this is the only way to show the difference between the two as we are in essence a Water Cooling review website and have only a few products to compare when it comes to air cooling.
 |
Temperature measurements were taken at idle and at full load.
Idle temperatures were taken after 1 hour of prime 95 then allowed to cool down naturally for half an hour.
Realtemp 3.0 was used and only maximum readings where taken.
We also did some minor overclocking in order to further stress the system.
All ambient air temperatures were at 23.5 degrees
Equipment Used:
- Core 2 duo 6300 CPU
- DFI LANPARTY P45 UT T3RS motherboard
- 2x GEIL DDR2 800 ram; Two gigabyte in total
- Alpenfohn Brocken ECO for comparision purposes.
Two makes things fair-even though the TSIS is bundled with TWO fans, we decided to complete initial testing with just one fan installed.
Results
STOCK speeds at 1.8HZ
Already we see some difference between both products, with the Riajintek TSIS winning by just one degree, however let us see what happens once the wattage goes up via overclocking.
 |
3.0GHZ OVERCLOCK
Now that we increase the wattage by Overclocking the processor to 3GHZ we should see a difference between the products
 |
At idle we see as expected a one degree differential at most, however when we are on full load the Raijintek TSIS shoots ahead by as much as two degrees.
3.2 GHZ
Again we see a consistent two degree temperature drop at full load.
 |
Lastly let us see what the Raijintek TSIS can REALLY do when both fans are installed.
 |
Now we are seeing something, now that both fans are installed the idle temperature differential has increased to two degrees whilst the full load has increased to three. All in all a very good result from Riajintek, so let us move on to the conclusion shall we?
Conclusion
This is one impressive piece of equipment. Its well engineered with quality parts right down to the screws and brackets. The concept of ‘thoughtfulness’ has been driven through from an installation and configuration point of view. The Riajintek cools our old core two duo 6300 down very well and does that with ease. A three degree temperature differential is nothing to be sneezed at and even when the price points are different (the TSIS being double the price of the Brocken) then we have a possible winner indeed and especially considering the price point.
However as usual there are the downsides. The most obvious is the sheer dimensions of the tower and fans make the installation of memory a difficult process indeed and one has to explore these options before purchase. However with a large heatsink on any product of this type, then this is always an issue. The only other issue was the lack of a ‘daisy chaining’ on the fans in order to only take up one fan port.
The Raijintek is one beast of a cooling solution and by our results it performs very well, also the nice extra touch of coating the entire tower with zinc, both helps the product to look good and protect the fins, unlike the Noctua D14
All in all a well thought out product.
Pros:
- Good protective packaging
- Quality accessories
- Zinc Coated
- Solid feel throughout (and we are not just talking about the weight)
- Interesting concept
- Great dual fans with the notched blades.
- Did we say quality? Then we will say it again Quality, Quality and Quality
- Performs very well
Cons:
- It could cause RAM spacing issues with your motherboard
- Lack of daisy chaining for the fans.
Overclockers Tech are pleased to announce score of 9.0 out of 10 and therefore a Gold award.
 |
We like to thank OCUK for our review sample, which can be purchased by clicking on the link below:
Author
Gilgamesh


 Posted in
